Tuesday 12 August 2014

There will be cake

 Aside from occasionally asking my mom to drive the 9 blocks to my house to pick me up and bring me back to her house, I tend to prefer not to ask too many favors. This policy is impractical when applying to medical school. I have asked for letters of evaluation. I have asked for input on secondary essays. I have asked for friends to remind me of what I was doing in college (I'm getting older, OK?). I have even had to ask multiple former employers and co-workers for permission to include their name and contact information on my application in case one or more of the twenty one medical schools to which I have applied doubts the veracity of my "Work/Activities" section and decides to seek confirmation. One such former co-worker, while willing to act as a reference if called upon, suggested that it might be befitting for us to reunite after the years that have passed since we were colleagues. This seemed only fair. We picked a place to convene, and I embarked on preparing a thank you cake. 


Summer Fruit Thank You Cake
adapted from Bon Apetit magazine

Upside down part
- 1 large peach or 2 small peaches, sliced into 1/2 inch thick segments
- 1 medium sized pluot or plum, sliced into 1/2 inch thick segments
- 1 cup sugar (recipe called for brown, but I ran out and (successfully) used a combination of white and brown)
- 1 tbsp honey
- 6 tbsp butter

Cake part
- 6 tbsp butter
- 1 cup sugar
- 2 eggs
- 1 tsp vanilla
- splash almond extract (more or less, but probably not exceeding 1/2 tsp)
- 1/2 cup milk
- 1 1/2 cups AP flour
- 2 tsp baking powder
- 1/2 tsp cinnamon
- pinch o' salt

Preheat oven to 350˚ F. Grease an 8 or 9 inch diameter cake pan. 

In a medium saucepan, mix the butter, sugar and honey from the upside down part. Warm over medium heat until melted together into a smooth mixture. Pour melty delight into the bottom of the cake pan. Arrange fruit on top in a nice pattern, or however you like. Set aside.
Combine the flour, bp, cinnamon and salt in a small bowl (or 2 cup measure, if you're concerned about wasting water washing dishes/lazy like me). Cream together butter and sugar (I recommend a stand mixer, but by hand is fine) until light and fluffy. Add the eggs one at a time and beat well. Mix in the extracts. 
Pour in the dry mixture alternating with the milk in three sections combining the ingredients after each addition. The final addition should be the last bit of milk. Give one final stir to make sure the batter is all combined, then pour over the fruit pieces in the cake pan. Bake in oven for 45-60 min. 
When you remove the cake, let it sit in the pan for 20 minutes (original recipe said 30, but who has that kind of patience). Place the serving dish over the top of the cake pan and invert the pan onto the platter. Before lifting off the pan, leave it upside down on the platter for 5 minutes. SERIOUSLY, DO THIS. Last but not least, gently lift the cake pan off the cake and voila. 

Tuesday 8 April 2014

Twenty seven?!?

Justin's birthday was last week. I didn't have time to make his cake until yesterday (which he graciously only complained about minimally). He had requested a German chocolate cake. When he told his grandmother I would be making one for him she sent over all the ingredients and the recipe she uses. "How sweet!" I reacted initially. "No pressure," the sarcastic lobe of my brain retorted. It was true: not only was this cake to be presented days after the actual birth date, it also had to live up to the cakes that had come before it, made by a baking queen. That said, I am not one to be daunted by the construction of a fancy-sounding three layer cake. Here is what followed:

Justin's Chocolate Cake
adapted from Grandmother's recipe

Cake
- 4 oz German sweet chocolate
- 1 cup butter
- 2 cups sugar
- 4 eggs, separated
- 2 cups cake flour
- 1 tsp baking soda
- 1/4 tsp salt
- 1 cup buttermilk

Frosting
- 12 oz (1 can) evaporated milk
- 1 1/2 cups sugar
- 1 1/2 sticks butter
- 4 egg yolks
- 1 1/2 tsp vanilla
- 2 2/3 cups coconut flakes (sweetened)
- 1 cup walnuts, chopped or smashed with bottom of a pan (recipe called for pecans...)

Preheat oven to 350˚. Grease 3 9inch pans (or, if you are like me and only have two, feel free to improvise using a pie pan or something comparable in time. Layer cakes are never totally even).

Melt the chocolate in a double boiler or microwave. Set aside.

Whip the egg whites to stiff peaks. Set aside.

Mix the flour, b.s. and salt together. Cream the butter and sugar until light and fluffy, preferably in a stand mixer. Add the egg yolks one at a time. Beat in the vanilla, then slowly beat in the chocolate. Once this mixture is just combined, start pouring in the flour mixture, alternating with the buttermilk (I couldn't remember if you are supposed to end with the wet or the dry component and the cake turned out just fine so I'm thinking the order is not so important). Last but not least, fold in the beaten egg whites. Divide the batter between the three pans and bake for 15-20 minutes. Cool completely.

Once the cakes are out, start on the frosting (cake needs to cool. Distraction by other projects during this time is key). Put the milk, sugar, butter, yolks and vanilla in a large saucepan. Heat over medium flame until thickened and golden brown in color (this took about 15 minutes. Special thanks to Justin for reminding me to be careful not to scramble the eggs during the heating). Remove from the heat. Stir in the coconut and walnuts.

By now, cakes should be transferred to a cooling rack. Let them cool completely, also allowing the frosting to cool. When the cakes are ready, begin assembling. Put bottom layer on a cake plate and dollop on a hefty spoonful of frosting. Spread gently, then top with second layer. Repeat. When the third layer is in place, very carefully coat the rest of the cake with the frosting (note: if the frosting or cake is too warm, this will be very challenging. The good news is the components of German chocolate cake are so sickeningly good that no matter how weird or deformed it looks, all will sing praises from around the world. On Instagram at least). 

Immediately call as many friends as you can and get at least half the cake out of your house, or factor in pants shopping for the following day. Either works.

Monday 2 September 2013

Peared (upside) down

Baking inspiration comes in many forms. Sometimes I am home alone and bored and use baking as a somewhat productive form of entertainment; sometimes (read: often) I just really need brownies. One of my favorite baking inspirations, though, is the fridge. Fruit has a limited shelf life and, as much as I love chomping on whole fruit, sometimes it just doesn't all get eaten.

A friend recently gifted me a bag of plums. I checked on the fruit after they spent a weekend in a plastic bag in my sun baked kitchen only to find that they were literally cracking. After panicking and googling "cracked plums," I decided that the plums would do just fine in an upside down cake. This cake ended up a great success (I think. I only tasted a small bite before Justin ate the entire thing in two days) and had to be recreated.

My devoted fans might recall guest baker Cady. Despite her inability to tolerate gluten, she has a great appreciation of sugar-based chemical reactions. She's also just awesome. In preparation for her birthday/housewarming celebration, I got to work on a cake replication. I just so happened to have a bag of pears in the fridge that needed to be baked. Using the plum cake recipe as inspiration, I came up with this:

Upside Down Pear Cake
adapted from http://allrecipes.com/recipe/plum-blueberry-upside-down-cake/

- 1/4 cup brown sugar
- 1 stick butter
- 1 cup granulated sugar
- 1 egg
- 1 tsp vanilla
- 1 1/4 cup flour (if using gluten free flour, add about 1 tbsp guar or xanthan gum)
- 1 1/2 tsp baking powder (if going the gluten free route, be sure to check that the b.p. is gluten free. If it doesn't specify that it is gluten free, it probably isn't)
- 1/2 tsp salt
- 1/2 tsp cinnamon
- 3/4 cup milk
- two small to medium sized pears, cut into 1/2 inch slices

Preheat oven to 350˚ F. Grease a 9-inch pie dish (a cake pan works as well, but since an upside down cake must be dumped out of the pan, I found a pie dish's slanted slides to be very conducive).

Spread the brown sugar on the bottom of the dish. Cut 3 tbsp of the butter into pieces and arrange over the sugar in the pan. Place in oven for about 5 minutes. Remove pan, gently stir the melted butter with the sugar, and replace in oven for 5 minutes or until mixture is bubbling. Remove and set aside.

Mix together the flour, baking powder, cinnamon, salt and binding gum (if using). In a separate bowl, cream remaining butter (should be about 1/3 cup) with granulated sugar. Add the vanilla and mix thoroughly, then beat in egg. Alternate pouring in the flour mixture and the milk in 3 additions, ending with the milk. After each addition mix until just combined. Arrange the pear slices overlapping slightly in a circle on top of the brown sugar/butter mixture.

Pour the batter on top of the fruit. Bake for 35-40 minutes. Let the cake cool for at least 15 minutes before turning onto a plate (for the impatient folk out there, learn from my mistake. The first time I tried this cake I didn't let it cool for long enough and much of the topping stuck to the pan when I turned it over. Cake surgery was required). This would probably be really tasty with vanilla ice cream.

Sunday 19 May 2013

Cloudy with a chance of limes

As I have mentioned previously, I was recently faced with the daunting task of making pie. After a successful run involving canned fruit, I stepped it up a tad with fresh pineapple-cherry pie. The other idea that had been tossed around was a lemon or lime pie. Citrus pies are a loophole in the rule of fruit pies that cost an arm and a leg to concoct (pineapple-cherry pie was clearly not), making both immensely appealing to my cheap side. Justin and I hit Trader Joe's for some lemons, limes and butter, then he had to go to work. I called Catey up and we went to Target. Her face brightened at the mention of lime pie as she recalled a key lime meringue pie she had sampled at Blue Heaven on a trip to Key West. Luckily, the internet led us right to the recipe. We got right to work (minus key limes, plus normal limes). It was so good that we ate the whole thing before Justin tried it, so I made another one.

Magical Vacation Lime Meringue Pie
Adapted from Blue Heaven Key Lime Pie

Crust Part:
- 3 cups graham cracker crumbs (original recipe called for 4 cups, but I think this was too much. On take two I used 3 cups and it was delicious)
- 1/2 stick of butter, melted
- 3/4 cup granulated sugar

Filling part:
- 1 cup lime juice (limes are really annoying to squeeze and don't yield a lot of juice, so we supplemented limes squeezed by Sophie with ready made lime juice)
- 2 cans (14 oz) sweetened condensed milk
- 8 egg yolks

Meringue part:
- 8 egg whites
- 1/2 tsp cream of tartar
- 1/3 cup powdered sugar

Preheat oven to 350˚.

First make the crust. Mix the graham cracker crust, melted butter and sugar together. Press the mixture into a 9 inch pie pan (use your hands and/or a spoon). Bake for 8 minutes, then remove to cool.

Have one of your trusty friends separate the eggs (thanks Luz!). Add the lime juice and sweetened condensed milk to the yolks and whisk together until well combined. Pour the filling into the pie crust and set aside. Use a kitchenaid or hand beaters to beat the egg whites to soft peaks. Add the cream of tartar and continue beating to stiff peaks. Add the sugar and beat until all whites are at stiff peaks. Dollop the mixture on top of the pie decoratively. A spoon or spatula is effective.

Bake for 15-30 minutes, or until meringue is mostly browned, but not entirely (the original recipe recommends testing the custard for doneness, but this was impractical to impossible with the height of the meringue. We based our decision to remove the pie on the meringue color alone).

Let cool for at least one hour before refrigerating. Let pie cool as long as humanly possible. Cut with a hot, wet serrated knife for best results. Yum.


Diced pineapples and cherries

About a week ago, I reached the last birthday milestone I will have until I start qualifying for social security: I turned 25 and can now rent a car without scaring the car rental companies with my youth. In honor of this magical day, Justin most thoughtfully gave me a cake stand. Shortly thereafter, he began demanding that I fill the cake stand with cakes. In the same sentence, he insisted that I use the rolling pin he gave me for Hannukah and the bag of whole wheat flour he gave me just because to make a pie. As you may have gathered from reading this blog, pie is not my forte. I have made many a pie in my day, but generally am intimidated either by the delicacy of pie crust or the price of a pound+ of fruit. That said, I had an immensely successful pie attempt recently using aforementioned whole wheat flour, along with some canned pineapple and jarred cherries (true, Julie and Sophie both encountered pits in their slices of pie, but no one died). I had first discovered this fruit combination when I made my first dump cake. What is dump cake, you may ask (assuming you did not grow up in rural Texas, where I believe it is quite well known)? Dump cake is something of a misnomer, as it more closely resembles a crumble. The "dump" part is also not what it sounds like (a garbage dump, obviously). Instead, it refers to the action of dumping a can of pineapple and a can of cherries into a pan, before dumping a box of yellow box cake mix on top and then delicately dumping chunks of butter on top. Bake for an hour and you have dump cake. Unsurprisingly, the union of cherries and pineapple results in a summery, pseudo tropical sweetness, enhanced by the crispy, buttery topping. The adapted pie form of dump cake looked something like this:
A few days after this pie was born (and immediately demolished), the baking bug struck again. I started with a lime meringue pie (post to come), assisted by Luz, Sophie and Catey, and then decided to move on to something with a non-graham cracker crust. I just so happened to have a whole fresh pineapple on hand. I had bought it for the purpose of consuming it as is, but after butchering the thing, it quickly became clear that a whole pineapple is a lot of pineapple. Justin had brought me some fresh cherries the day before, and these were also sitting around that evening. The idea of pitting a bag of cherries seriously clashed with my lazy style. Luckily, Catey was more than happy to rise to the occasion. While I threw together a pie crust, she halved and pitted each and every cherry. Here is how the rest went:

Pineapple-cherry pie from scratch

Pie crust part:
(adapted from Bob's Red Mill)
- 2 cups whole wheat flour (I used Bob's Red Mill because I'm classy)
- 3/4 cups butter (unsalted is good, but it's OK to use some salted if you like salt)
- 1 tsp salt
- 3-6 tbsp ice water (half the water can be substituted with vodka if you have some handy)

Pie part:
- 1 pineapple, diced (minus about 1 cup for eating)
- about 2 cups cherries, pitted
- 1/2 cup water
- 1/4-1/2 cup sugar (to taste. Also depends on sweetness of the fruit you are using)
- 4 tbsp cornstarch

If you have a food processor, use this to make the crust (if not, knives, a pie cutter or hands will work). Place the flour and salt in the food processor. Pulse a few times to blend. Add the butter, cut into chunks, and blend until the mixture is in course chunks. Add the water one tablespoon at a time, mixing after each addition. When the mixture comes together in one clump as it is mixed, the crust is done. Separate dough into two pieces, wrap in plastic wrap and refrigerate for about 30 minutes.

Preheat oven to 350˚ F. Roll out the larger piece of dough (one will be larger. No one is perfect) on a floured surface. Transfer the dough into an 8 inch pie pan. (Note: the whole wheat flour makes this dough very fragile. Don't be alarmed if it seems to be cracking or breaking more than usual. Just pinch it back together. Handle the dough as little as possible for maximum flakiness). Bake the crust for about 10-13 minutes, or until just starting to brown. (I didn't use pie weights and it turned out fine, but feel free to use something to keep the dough from shrinking or bubbling). Remove crust from the oven to cool.

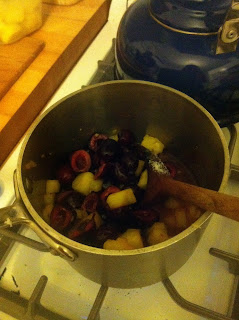
While the crust is cooling, begin on the filling. Place the fruit, sugar and water in a medium pot. Bring water to boil then reduce heat to medium, stirring frequently. Simmer until fruit starts to cook down and the liquid is slightly syrupy, about 15-20 minutes. Add the corn starch and stir, still over low-medium heat, until the mixture thickens.
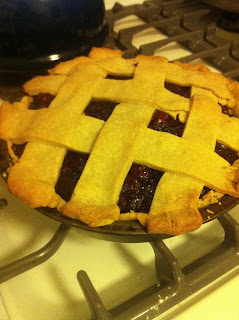
Roll out the other half of the dough on a floured surface. If your lovely friend gave you pie crust cutters for your birthday, use one to punch out cute shapes to decorate the top of the pie. If not, you can make a lattice, or just a full top crust. If you do a top crust, be sure to make some holes in the top for steam to escape.

Pour the filling into the crust and decorate the top with your design of choice. Bake for 35-45 minutes, or until crust is cooked through. Let cool for as long as you can resist before slicing and devouring.

Saturday 27 October 2012

Oops I did it again

And by oops, I mean that is what everyone who missed out on these bagels should be thinking (cough Justin cough). As my loyal fans will recall, I recently concocted gluten free bagels with/for Cady. I was impressed with how easy the whole process was. Bread making is rarely too intellectually challenging, but it requires attention to detail and patience. I have been known to display attention to detail on occasion. Patience less so. That said, the manageable rising time of bagels was very appealing, so much so that I was determined to make gluten-full bagels. I found a recipe for New York style bagels (the only real kind) from the Sophisticated Gourmet and adapted it to include a kitchenaid.

Bass's Bagels

- 1 packet active dry yeast (2 1/4 tsp)
- 1 1/2 tbsp sugar
- 1 1/4 cups warm water
- 3 1/2 cups flour (and some more for kneading)
- 1 1/2 tsp salt
- finely chopped onion, about 1/4 cup (more or less depending on how many onion bagels you want. You can also add poppy/sesame seeds or whatever toppings you want)

Put the yeast and sugar in a bowl with 1/2 cup of the water. Let sit for 5 minutes without stirring, then mix until sugar and yeast dissolve.
 Place the flour and salt in the mixing bowl of your stand mixer (note: stand mixer not mandatory. You can do this by hand). Attach dough hook. Mix the dry ingredients until a well forms (or make a well). Pour in the yeast mixture.  Add another 1/2 cup of the water. Start mixing on medium speed. If the dough is too dry and floury, add more water in tablespoons until all is incorporated. Knead/mix for about 10 minutes. Add another tablespoon or so of flour to make a firm dough. 
Once the dough has been kneaded/dough hooked, pour a small amount of oil into the bowl and coat the dough. Cover with a damp dish towel and let rise for 1 hour in a warm place (I turned on the central heating, then went to run errands. Patience is challenging). Once the dough has risen, punch it down (literally), then let it rest for 10 minutes. Divide the dough into 8 pieces. Shape the dough into a ball, pulling the loose ends together at the bottom of the dough ball. Poke a hole in the center of each dough ball to form a ring. Note: this step differed from the previous bagel shaping technique Cady and I had used. Of the two, I think I prefer the latter. My unable-to-resist-critiquing father noted that the hole in these bagels did not all hold their hole shape. However, as anyone who has had a NY bagel knows, sometimes you can't see through the bagel. It is still superior too all other bagels.
Place the dough bagels on a cutting board or cookie sheet and cover with a damp towel. Let rest for 10 minutes. During this time, preheat oven to 425 degrees F and bring a large pot of water to boil (about 4 quarts). Once the water is boiling, reduce heat and gently lower the bagels in. Let them boil for 1-2 minutes on each side (2 minutes makes a chewier (read: better) bagel). Remove the bagels with a slotted spoon and place them on a greased cookie sheet. Beat an egg for a wash and brush each bagel with egg. Put the toppings on the bagels you are topping. I did some onions this time per aforementioned father's request. Once bagels are egg-washed and topped, place them in the oven and bake about 20 minutes, or until brown. Cool on a baking sheet. Eat with cream cheese, lox, butter, nothing. Lastly, I know I make most things look easy, but this is one accomplishment that I am convinced most could achieve. Do it.

Tuesday 9 October 2012

Poppies

Once again, a beloved friend of mine celebrated reaching twenty-something-hood. Catey's 24th birthday was an extended celebration, beginning on the evening before her birthdate and ending (a week later) with cake. I asked Catey what she wanted for her birth treat a few days before the big day. "I'm glad you asked," she said. She requested that I recreate a poppy seed cake I had made in high school for another birthday party. Apparently the cake had left such an impression that Catey had spent the last 5 birthdays longing and pining for this cake. Well, finally we were in the same place at the right place. Her wish was my command. (I will also add that I received some flack for adapting Mollie Katzen's poppy seed cake recipe, which involved lemon, into a lemon-free poppy seed cake. To this I say haters to the left. The cake was off the chain. Again).

Poppy Seed Birthday Cake
Adapted from The New Moosewood Cookbook by Mollie Katzen

Cake Part:
- 3/4 cup poppy seeds
- 1 cup milk
- 2 sticks butter
- 1 cup sugar
- 3 eggs
- 2 cups flour
- 1 tbsp baking powder
- 1 tsp baking soda
- 1/2 tsp salt
- 1 tsp vanilla extract

Frosting Part:
- 8 oz cream cheese, room temp
- 8 oz butter, room temp
- 3/4 pound powdered sugar
- 1 tsp vanilla

Grease two 8" cake pans (the recipe called for a bundt or tube pan. I had neither, so I made  layer cake). Preheat oven to 350 degrees F. 

Pour the poppy seeds and milk in a saucepan. Heat on medium heat until just before the milk boils (aka scald the milk). Set aside. 
In your hand standy mixer, cream the butter and sugar together. Add the eggs one at a time, beating after each addition. In a separate bowl, mix the flour, b.p., b.s. and salt. Alternate adding the dry ingredients and the milk/poppy mixture to the creamed mixture, starting and ending with the milk. Beat until just combined after each addition. Mix in the vanilla. Divide the batter evenly into the two cake pans. 
 
Bake for 30-45 minutes (I checked the cake often because the baking time provided by Mollie's recipe was for a single large cake, rather than two. The bake time ended up being pretty close to that provided in the recipe). They will be done when they are golden brown and a toothpick comes out clean.
While the cake is baking, create the frosting. Note: Mollie's recipe does not call for cream cheese frosting. This decision was inspired by my childhood birthday celebrations. As my mum likes to reminisce, she always ordered me poppy seed cakes with cream cheese frosting, knowing full well that many children would not want all their the frosting and would donate the remnants to her plate. Genius. In conclusion, poppy seed cake (withOUT lemon) is perfectly complemented by cream cheese frosting (then again, what isn't)? Beat the butter and cream cheese together. Add the sugar, 1 cup or so at a time. Note: Many recipes call for more powdered sugar than I used, but I find that the sweetness overpowers the rest of the frosting and often the cake. Add sugar to taste. Beat in the vanilla.
Once the cakes are cooled, let the frosting begin. If you are lucky, maybe your boyfriend will put toothpicks in the cake (apparently this is a trick for frosting. It does leave you with the risk of getting splinters in your tongue, but the cake looked good). We served the cake at Catey's bar. It was yummy. Make this. PS. We decorated the cake the pieces of fresh fig because we are creative and resourceful. Do the same with whatever you want.